Contents
Overview
This Package implements fiducial markers for camera pose estimation or object detection. Right now we implemented the PiTag marker, a variation of it the Fast PiTag and the Aruco marker.
- Maintainer status: maintained
Maintainer: Jan Fischer <Jan.Fischer@ipa.fraunhofer.de>
- Author: Matthias Nösner
source: git https://github.com/ipa320/cob_object_perception/tree/groovy_dev/cob_fiducials
Download
The cob_fiducial package is part of cob_object_perception. It is available on Github an can be cloned with
git clone https://github.com/ipa320/cob_object_perception.git
There are also dependencies to the package cob_perception_common. This can be cloned from Github with
git clone https://github.com/ipa320/cob_perception_common.git
Calibration Requirements
The used camera needs to be calibrated. Ros provides a calibration method based on a chekkerboard detection ROS_Calibration.
How To Use
The package can be used via a launch file which loads all parameters from a .yaml file and starts the cob_fiducial node. For each Marker System a individual .yaml file is defined.
Getting Started
At first modify your prefered launch file from ros/launch/ to remap your camera image topic e.g. /camera/rgb to the rgb_topic, which is expected by the software. Then start the cob_fiducial node
roslaunch cob_fiducials fiducials.launch
to start the marker detection using the topic interface
rostopic hz /fiducials/detect_fiducials
to start the marker detection using the service call interface e.g. for detecting tag_0. The name is a composite of the string 'tag_' and the ID specied in the xml parameter file (see below).
rosservice call /fiducials/get_fiducials tag_0
For visualization you can use image_view
rosrun image_view image_view image:=/fiducials/image
Marker Selection
As seen the cob_fiducials node is initialized using a launch file. In the launch file the different marker detections algortihms for PiTag and Aruco can be choosen.
For PiTag the following row must be in the launch file
<rosparam command="load" ns="fiducials" file="$(find cob_fiducials)/ros/launch/fiducials_0.yaml"/>
For Fast PiTag another .yaml file is provided
<rosparam command="load" ns="fiducials" file="$(find cob_fiducials)/ros/launch/fiducials_fpitag.yaml"/>
For Aruco(WARNING: Aruco is working. But fiducials_1.yaml does't load the Aruco detection in the latest release!)
<rosparam command="load" ns="fiducials" file="$(find cob_fiducials)/ros/launch/fiducials_1.yaml"/>
.
Marker Specifications
The Size of a Marker and other spezific parameters can be adjusted individually for both Marker Systems. The files are located in
cob_fiducials/common/files/models
.The blueprints to use with the parameter files are located in
cob_fiducials/common/files/fiducials
.They should be printed on white paper to guarantee a high contrast.
Parameter Files
Exemplary parameterfile for PiTag
<FiducialDetector>

<FPITAG value="1"/> //optional parameter [0 = PiTag, 1 = FPiTag]
<PI>

<ID value="0" />
<LineWidthHeight value="0.1" />

<CrossRatioLine0 AB="0.40" AC="0.60" />
<CrossRatioLine1 AB="0.20" AC="0.80" />

<Offset x="-0.125" y="0.175" />

<SharpnessArea x="-0.01" y="-0.01" width="0.12" height="0.12"/>

</PI>
</FiducialDetector>
Exemplary parameterfile for Aruco
<FiducialDetector>
<Aruco>

<ID value="341" />
<LineWidthHeight value="0.1"/>

<Offset x="0" y="0" />

</Aruco>
</FiducialDetector>
Notice: PiTag's are distinguished from each other through the cross ratio. Aruco's only by ID. Miultiple discriminable Tag's can be defined in each parameterfile.
Overview of the Markers
PiTag
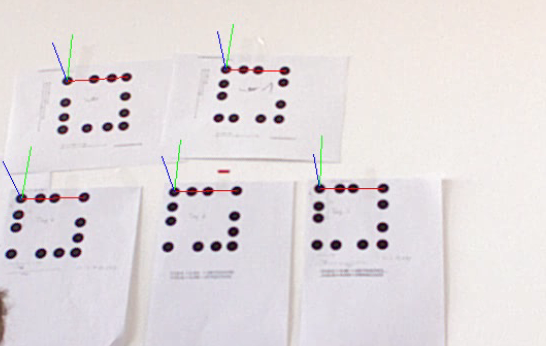
PiTag stands for Projective Invariant Tag, due to the detection algorithm which is based on projective invariants. The Paper with all information about the marker can be viewed here PiTag. There is a PiTag generator in https://github.com/raultron/PiTag-generator. The Picture below displays 5 different encoded markers.

Creation of PiTag
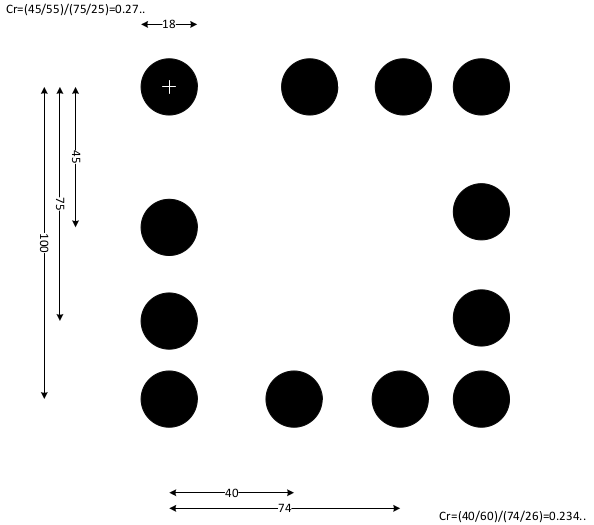
The Dimensions of a PiTag marker is displayed in the following picture. Each marker constists out of four lines with two different cross ratios. The lines with the highest cross ratio are attached to the top left corner. The lines with the lowest cross ratios are attached to the bottom right corner.

Fast PiTag
The name Fast PiTag (FPiTag) is based on the reduced execution time of the detection algorithm compared to the original approach. Based on the additionally added concentrics rings a smaller region of interest can be determined to apply the PiTag detection algorithm. Especially in highly structured areas or when using high resolution cameras it enables a fast marker detection and a lower false positive rate.

Aruco
Aruco was made for educational purpose, the belongig webpage can be found here Aruco. A Marker with the coding 341 is displayed below.

Creation of Aruco
The marker consists of a 7 × 7 square array with outer squares in black. The 5 × 5 center part of the marker is used to add information to the marker and distinguish between different markers. Each row is interpreted as a word with five bits. To increase the robustness each row has only two data bits, the other bits are used for failure detection with Hemming Code. Thus, 2^10 different marker configurations are possible.
