Documentation
New in ROS Melodic
Contents
Overview
Often during a development, a robot depend on a lot of parameters. Debug a robot with a lot of parameters may be not user friendly because we are limited by using only one mouse and one keyboard. This solution allows to debug your robot easily in using your two hands. The project can be implemented on any ROS robot.
Anyone, who has arduinos and actuators (buttons, switches, potentiometers...) can use pouco2000 for his robot.
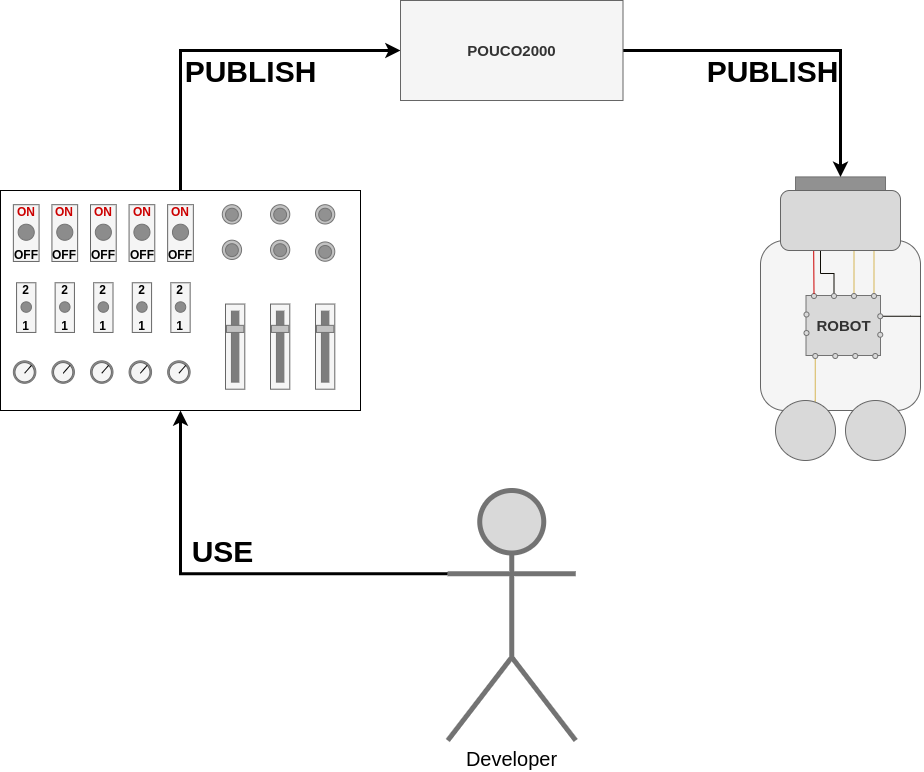
This diagram represents the goal of this project.
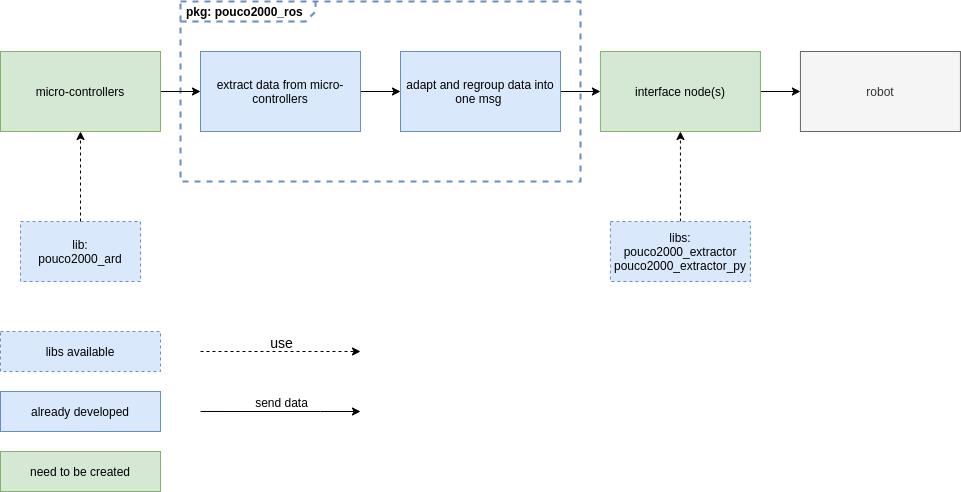
This diagram represents the pipeline from micro-controllers to your robot.
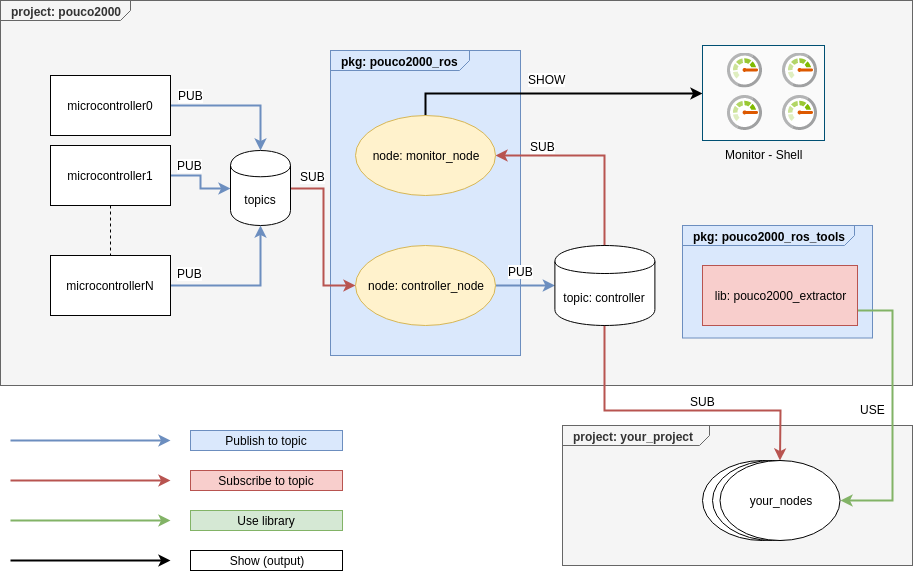
This diagram represents the principal workflow of pouco2000
Get Started
Create pouco2000 board
Hardware part
You have to build your pouco2000 board, just connect some buttons, switchs, potentiometers to an or several Arduinos. And use the pouco2000_ard library.
Software part
A library has been created helping to create your own code. To use it, you need to copy or create symbolic link to pouco2000_ard folder to Arduino/libraries.
cd {Arduino/libraries/path}
USER$ ln -s {pouco2000/arduino/lib/pouco2000_ard/path} pouco2000_ard
Once available, you can create a code for each Arduino. You can refer to examples for more information how to use the library.
└── lib
    └── pouco2000_ard
        ├── examples
        │   ├── buttons
        │   │   └── buttons.ino
        │   ├── potentiometers_circle
        │   │   └── potentiometers_circle.ino
        │   ├── potentiometers_slider
        │   │   └── potentiometers_slider.ino
        │   ├── switchs_mode
        │   │   └── switchs_mode.ino
        │   └── switchs_onoff
        │       └── switchs_onoff.ino
        └── pouco2000.h
From Arduino IDE, you can access to these examples by this way: "file -> Examples -> pouco2000_ard"
Example
   1 //[STEP01] include the lib
   2 #include <pouco2000.h>
   3 #define DELAY 50
   4 //[STEP02] define pins array for each field
   5 int switchs_pin_connections[] = {3,1,5,6};
   6 int buttons_pin_connections[] = {2,7,8};
   7 int potentiometer_circle_pin_connections[] = {A3,A5};
   8
   9
  10
  11 //[STEP03] define handle for each field
  12 HandleSwitchsOnOff handle_switchs(TOPIC_SWITCHS_ON_OFF,
  13                                   switchs_pin_connections,
  14                                   sizeof(switchs_pin_connections)/sizeof(int));
  15
  16 HandleButtons handle_buttons(TOPIC_BUTTONS,
  17                               buttons_pin_connections,
  18                               sizeof(buttons_pin_connections)/sizeof(int));
  19
  20 HandlePotentiometers handle_potentiometers(TOPIC_POTENTIOMETERS_CIRCLE,
  21                                             potentiometer_circle_pin_connections,
  22                                             sizeof(potentiometer_circle_pin_connections)/sizeof(int),
  23                                             false);
  24
  25 // first string is the topic name, please use define variable already created
  26 // false: eq this handle manages analog elements
  27
  28 ros::NodeHandle nh;
  29
  30 void setup() {
  31   nh.initNode();
  32   //[STEP04] setup each handle
  33   handle_switchs.setup(nh);
  34   handle_buttons.setup(nh);
  35   handle_potentiometers.setup(nh);
  36 }
  37
  38 void loop() {
  39   //[STEP05] update each handle
  40   handle_switchs.update();
  41   handle_buttons.update();
  42   handle_potentiometers.update();
  43
  44   nh.spinOnce();
  45   delay(DELAY);
  46 }
Create an interface
You need to create an interface binding commands from micro-controllers to your project.
For this, you have to create one or several nodes, that subscribe to the controller topic, allowing to get information from micro-controllers state and publish some commands to your robot.
pouco2000_extractor lib extracts easily data from controller msg. This library is defined inside pouco2000_ros_tools package. If you want to use it, add in your depend package pouco2000_ros_tools.
this library is also available in python: pouco2000_extractor_py
Simple examples have been created, look examples inside pouco2000_ros_demo for understanding how to do this.
Example
   1 class DemoExtractor{
   2   private:
   3     // extractors
   4     HandleExtractors* handle_extractor;
   5     // sub
   6     ros::Subscriber sub;
   7
   8     void callback(const pouco2000_ros_msgs::Controller::ConstPtr& msg){
   9       if(handle_extractor->get_button(0)->is_push(msg)){
  10         ROS_INFO("button 0 pushed");
  11       }
  12
  13       if(handle_extractor->get_button(3)->is_push(msg)){
  14         ROS_INFO("button 3 pushed");
  15       }
  16
  17       if(handle_extractor->get_switchs_modes(3)->is_mode(msg,0)){
  18         ROS_INFO("switch_modes 3 is on mode 0");
  19       }
  20
  21       if(handle_extractor->get_switchs_onoff(3)->is_on(msg)){
  22         ROS_INFO("switch_on_off 3 is on");
  23       }
  24
  25       float value_circle;
  26       if(handle_extractor->get_potentiometers_circle(3)->extract_only_change(msg,value_circle)){
  27         ROS_INFO("potentiometers_circle 3 value: %f",value_circle);
  28       }
  29
  30       float value_slider;
  31       if(handle_extractor->get_potentiometers_slider(3)->extract_only_change(msg,value_slider)){
  32         ROS_INFO("potentiometers_slider 3 value: %f",value_slider);
  33       }
  34
  35     }
  36
  37   public:
  38     DemoExtractor(ros::NodeHandle& nh,const std::string &topic){
  39       // instanciate extractors
  40       handle_extractor = new HandleExtractors();
  41       // instanciate subscriber to controller
  42       sub = nh.subscribe(topic,1000,&DemoExtractor::callback,this);
  43     }
  44 };
Start communication
roslaunch pouco2000_ros release.launch
this launch starts communication with micro-controllers in using rosserial pgk. Please adapt USB interfaces and add a node for each micro-controllers inside release.launch. The launcher "_add_board" allows to init a board, only the port need by given.
<include file="$(arg add_board)">
   <arg name="board_port" value="$(arg /dev/tty...)"/>
</include>
this launch starts also the node (controller_node) allowing to regroups information and publish them into one msg.
Introspection
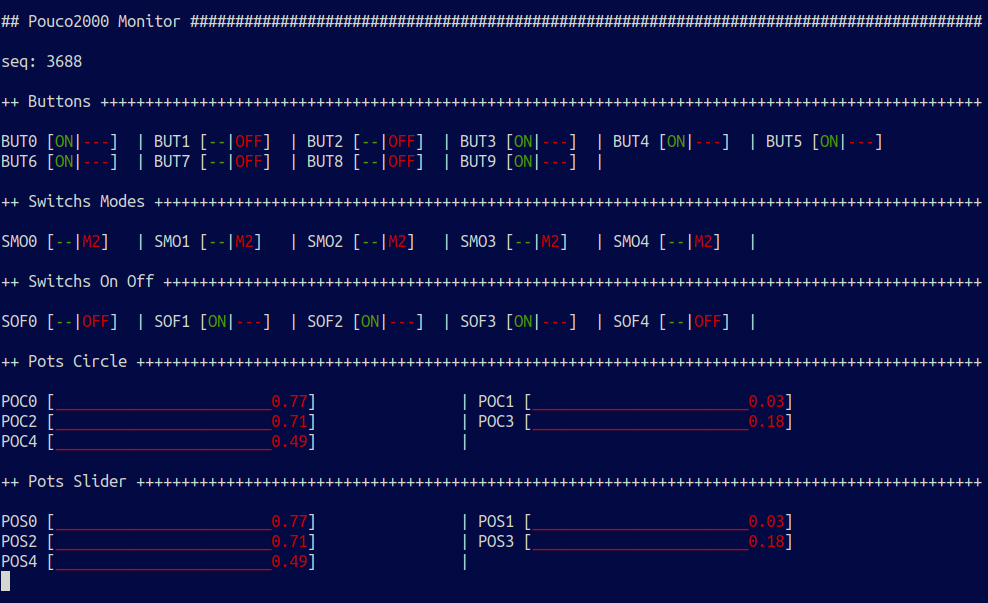
You can watch the current state of your board in "real-time" in executing the node monitor_node from pouco2000_ros package.
roslaunch pouco2000_ros monitor_node
This is a screenshot of monitor_node:
Configurations
Configurations can be split into 2 parts:
Remote
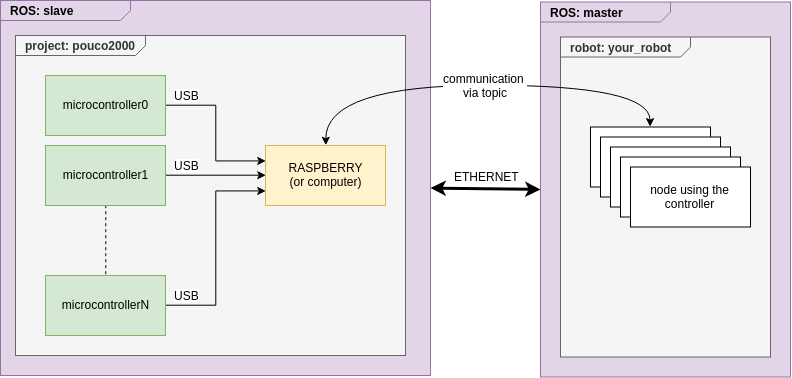
The connection between the pouco2000 project and your robot can be done by using ROS master/slave. Like this:
For more information about ROS master/slave: ROS/Tutorials/MultipleMachines
Local
The connection can be done directly by USB. 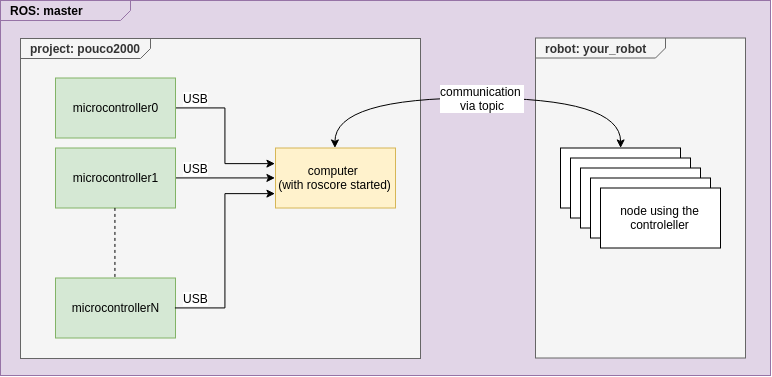
Documentation
Controller msg
Header header
Buttons buttons
SwitchsOnOff switchs_on_off
SwitchsMode switchs_mode
Potentiometers potentiometers_circle
Potentiometers potentiometers_slider
the msg can be seen like this:
Header header
[bool,bool,...] buttons
[bool,bool,...] switchs_on_off
[uint8,uint8,...] switchs_mode
[float32,float32,...] potentiometers_circle
[float32,float32,...] potentiometers_slider
More information
For more information about this project. Refer to the readme available on the repo github https://github.com/pousspouss/pouco2000.
Once compiled, each package gets a doc folder with a doxygen documentation.
Report a Bug
Use GitHub to report bugs or submit feature requests. [View active issues]

