Only released in EOL distros:
Package Summary
The vigir_footstep_planning package is a stack for the whole footstep planning system. It contains the top-level launch files and may be used to include all dependencies.
- Maintainer status: maintained
- Maintainer: Alexander Stumpf <stumpf AT sim.tu-darmstadt DOT de>
- Author: Alexander Stumpf <stumpf AT sim.tu-darmstadt DOT de>
- License: GPLv3
- Source: git https://github.com/team-vigir/vigir_footstep_planning_core.git (branch: master)
Overview
The vigir_footstep_planning stack provides an integrated full 3D footstep planner. It was originally based on the search-based footstep_planner (using A* from SBPL) and has been intensively extended/rewritten to enable the generation of feasible footstep placements based on perceived 3D data. It can cope with sloped terrain and uses overhanging steps to improve planning performance. The footstep planning system is designed to be easily deployable and adaptable to any humanoid bipedal robot. It can be either used as a 3D planner out of the box, as a research tool in bipedal search-based planning or for benchmarking walking controllers in difficult terrain.
For improvement mission performance in real world scenarios, the footstep planner implements a comprehensive set of coactive footstep planning services. In this way, it enables human-in-the-loop planning to combine human intelligence and capable footstep placement algorithms to generate quickly a safe sequence of footstep placements through challenging terrain (examples see under sample applications).
Details are available in following publications. Please also consider citing our paper if you use the footstep planner in your research.
"Open Source Integrated 3D Footstep Planning Framework for Humanoid Robots" by A. Stumpf, S. Kohlbrecher, D.C. Conner and O. von Stryk (Humanoids 2016).
@INPROCEEDINGS{2016:Humanoids-Stumpf,
  author = {Stumpf, Alexander and Kohlbrecher, Stefan and Conner, David C and von Stryk, Oskar},
  title = {Open source integrated 3D footstep planning framework for humanoid robots},
  booktitle = {Humanoid Robots (Humanoids), 2016 IEEE-RAS 16th International Conference on},
  pages = {938--945},
  year = {2016},
  organization = {IEEE}
}
"Supervised Footstep Planning for Humanoid Robots in Rough Terrain Tasks using a Black Box Walking Controller" by A. Stumpf, S. Kohlbrecher, D.C. Conner and O. von Stryk (Humanoids 2014).
@INPROCEEDINGS{2014:Humanoids-Stumpf,
  author = {Supervised Footstep Planning for Humanoid Robots in Rough Terrain Tasks using a Black Box Walking Controller},
  title = {Supervised Footstep Planning for Humanoid Robots in Rough Terrain Tasks using a Black Box Walking Controller},
  year = {2014},
  pages = {287-294},
  month = {Nov 18-20},
  address = {Madrid, Spain},
  booktitle = {Proc. IEEE-RAS Intl. Conf. Humanoid Robots},
}
"A comprehensive software framework for complex locomotion and manipulation tasks applicable to different types of humanoid robots" by S. Kohlbrecher, A. Stumpf, A. Romay, P. Schillinger, O. von Stryk and D.C. Conner (Frontiers in Robotics and AI 2016).
@ARTICLE{2016:FRAI-Kohlbrecher-etal,
  author = {Kohlbrecher, Stefan and Stumpf, Alexander and Romay, Alberto and Schillinger, Philipp and von Stryk, Oskar and C. Conner, David},
  title = {A comprehensive software framework for complex locomotion and manipulation tasks applicable to different types of humanoid robots},
  journal = {Frontiers in Robotics and AI},
  year = {2016},
  pages = {online},
  doi = {10.3389/frobt.2016.00031},
  url = {http://journal.frontiersin.org/article/10.3389/frobt.2016.00031},
}
Modular Design using Plugins
The footstep planning system is designed to be easily adaptable to the target robot system. For this purpose the entire footstep planning pipeline has been "pluginized", thus the system can be easily modified by adding or replacing plugins in the pipeline.
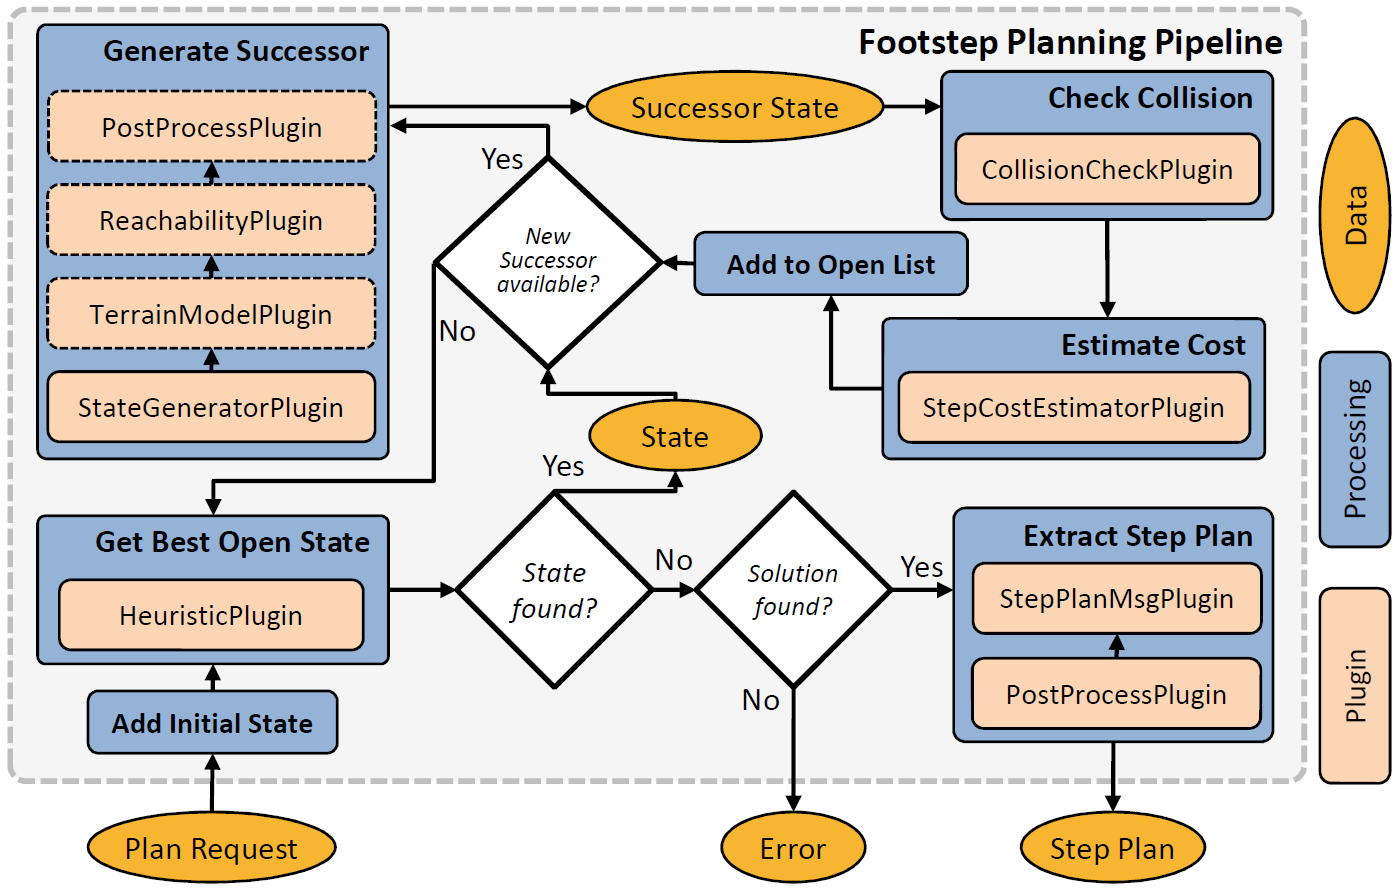
This allows for adaptive code execution even during runtime which is superior to classic parameter-based systems. Although plugins can provide new code for the pipeline, already existing code is kept untouched which simplifies code maintenance and improves code stability. In order to achieve this kind of versatile code management, the vigir_pluginlib has been developed.
3D Planning
See under sample applications.
Terrain Generation
The footstep planning system comes already with a terrain generator. It requires only incremental pointclouds as input given in a global reference frame (requires robot state estimation).
Interactive/Supervised Planning
The system provides comprehensive services to modify single steps or complete plans. In this way, the planner can incorporate human intelligence to generate safe footstep placements. On the other side, it assists the human user to create footstep placements quickly and safely.
Getting Started
Installation
The vigir_footstep_planning stack consists of multiple repositories located at GitHub:
https://github.com/team-vigir/vigir_footstep_planning_msgs.git
https://github.com/team-vigir/vigir_footstep_planning_basics.git
https://github.com/team-vigir/vigir_footstep_planning_core.git
Those and all non-ROS-deb dependencies which are listed below have to be cloned into your ros workspace:
After a recompile of your workspace, everything should be ready to work.
Planning System Startup
The stack comes already with ready-to-use demos. The footstep planning system demo can be launched by:
roslaunch vigir_footstep_planning footstep_planner_test.launch
All generated step plan are published on vigir_footstep_planning/step_plan.
Planning in RViz
A fully pre-configured RViz environment is started by:
roslaunch vigir_footstep_planning rviz_footstep_planning.launch
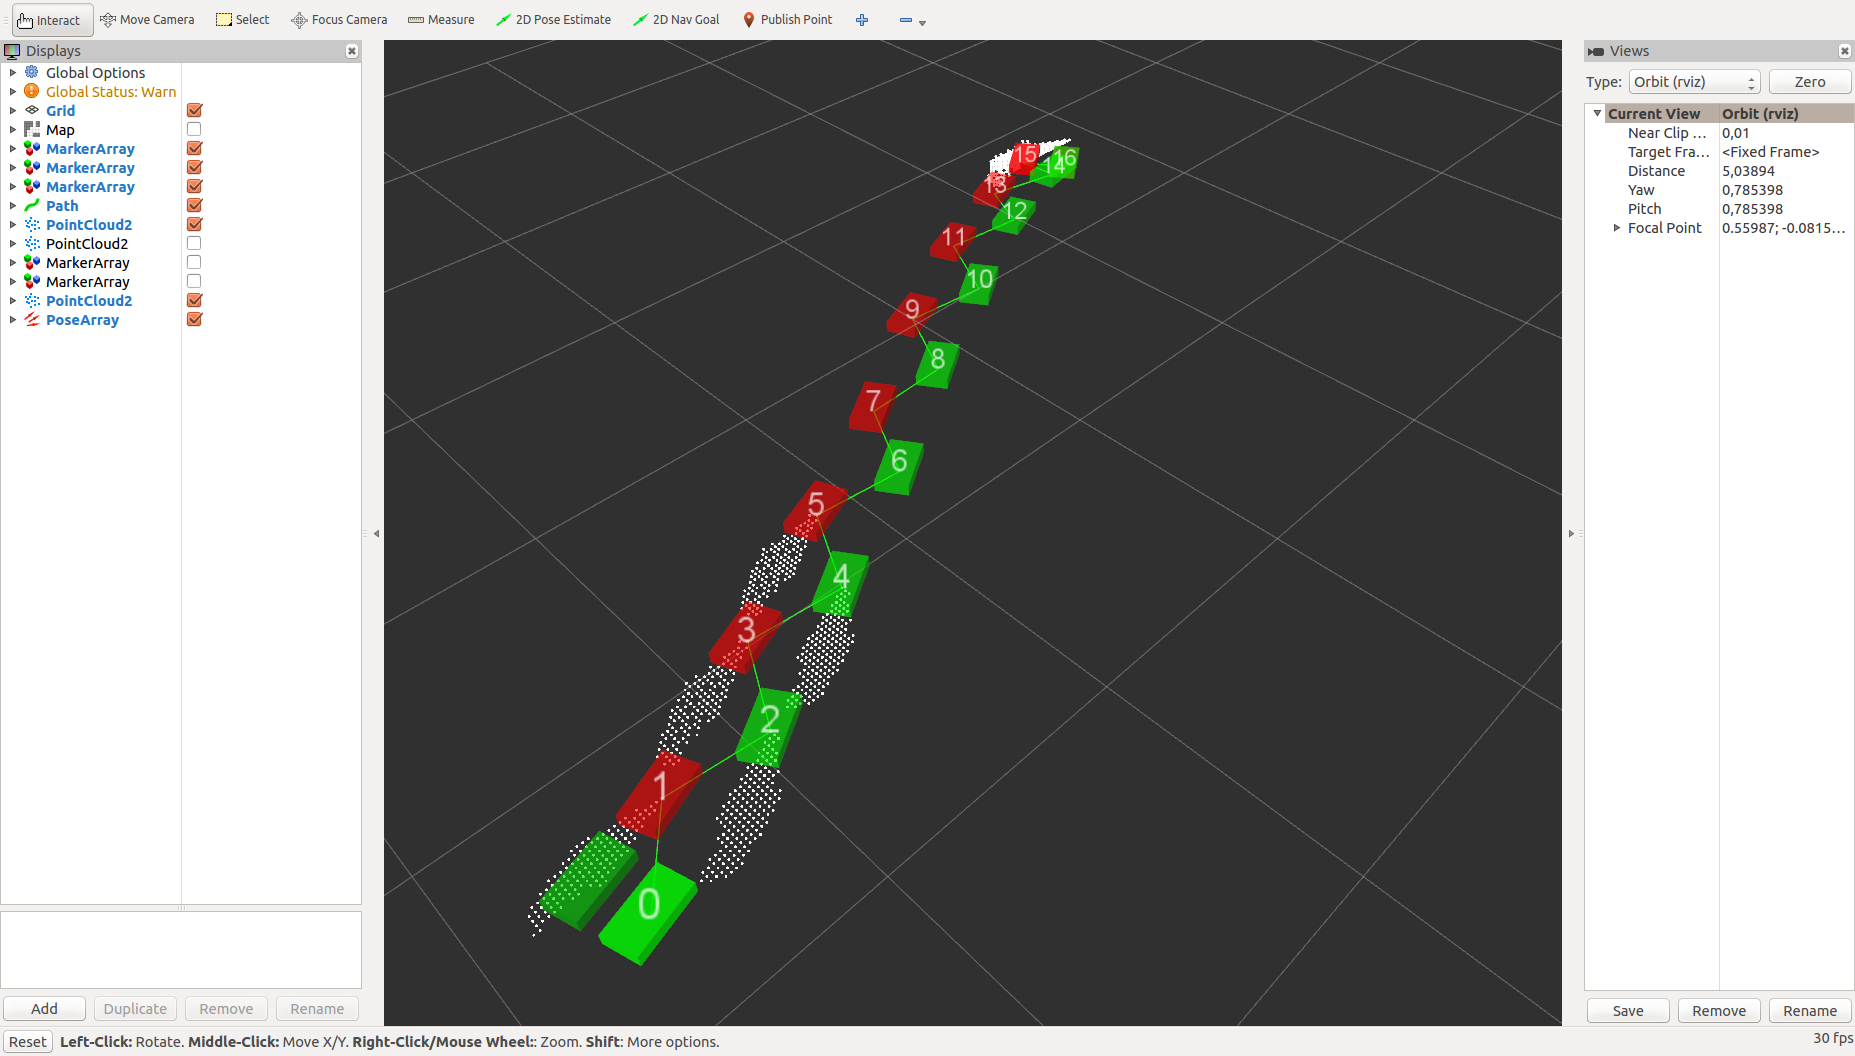
You can just place a start pose (2D Pose Estimate (hotkey "p")) and goal pose (2D Nav Goal (hotkey "g")) to trigger planning. You should be able to follow the planning process and receive a result at the end.
Manual Step Generation
The planning system is also capable to provide manual step generation. For this purpose the rqt widget can be launched by:
roslaunch vigir_footstep_planning step_interface_rqt.launch
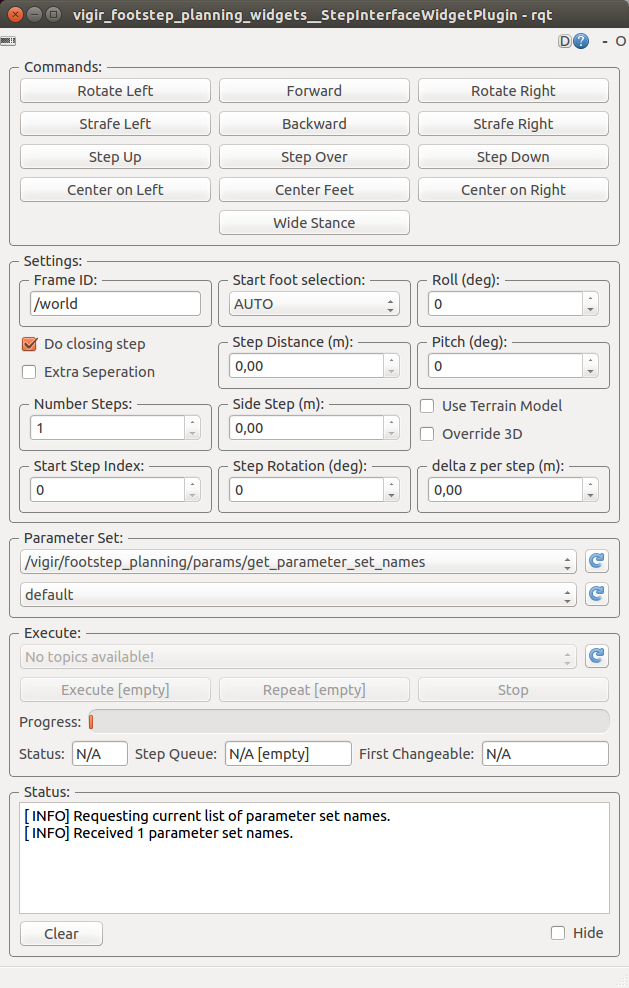
Using this widget allows to lay down patterns of step placements manually. Each parameter can be set individually in this widget. It also includes an interface for the vigir_step_control which manages step execution on the robot.
Note: Before the direction commands become activated you have to select a parameter set from the parameter selection section.
3D Planning
For a quick demonstration of the 3D planning capabilities the vigir_terrain_classifier package can be used here. In order to use that package clone and compile from
https://github.com/team-vigir/vigir_terrain_classifier.git
Note: The terrain generator does only consider all point cloud data around the current robot pose to reduce computational cost. Therefore you should place a 2D pose estimate (hotkey "p") in RViz in a feasible region of the input pointcloud (see below) to obtain a world model.
Using Test PointCloud
Create the pcl subfolder in the vigir_terrain_classifier package. Download and extract the example pointcloud files from here into this recently created directory. Afterwards you are able to launch the terrain generator test environment (while the footstep planning system is already running in the background):
roslaunch vigir_terrain_classifier terrain_classifier_test.launch
After a few seconds you should be able to see an accumulating world model like this: 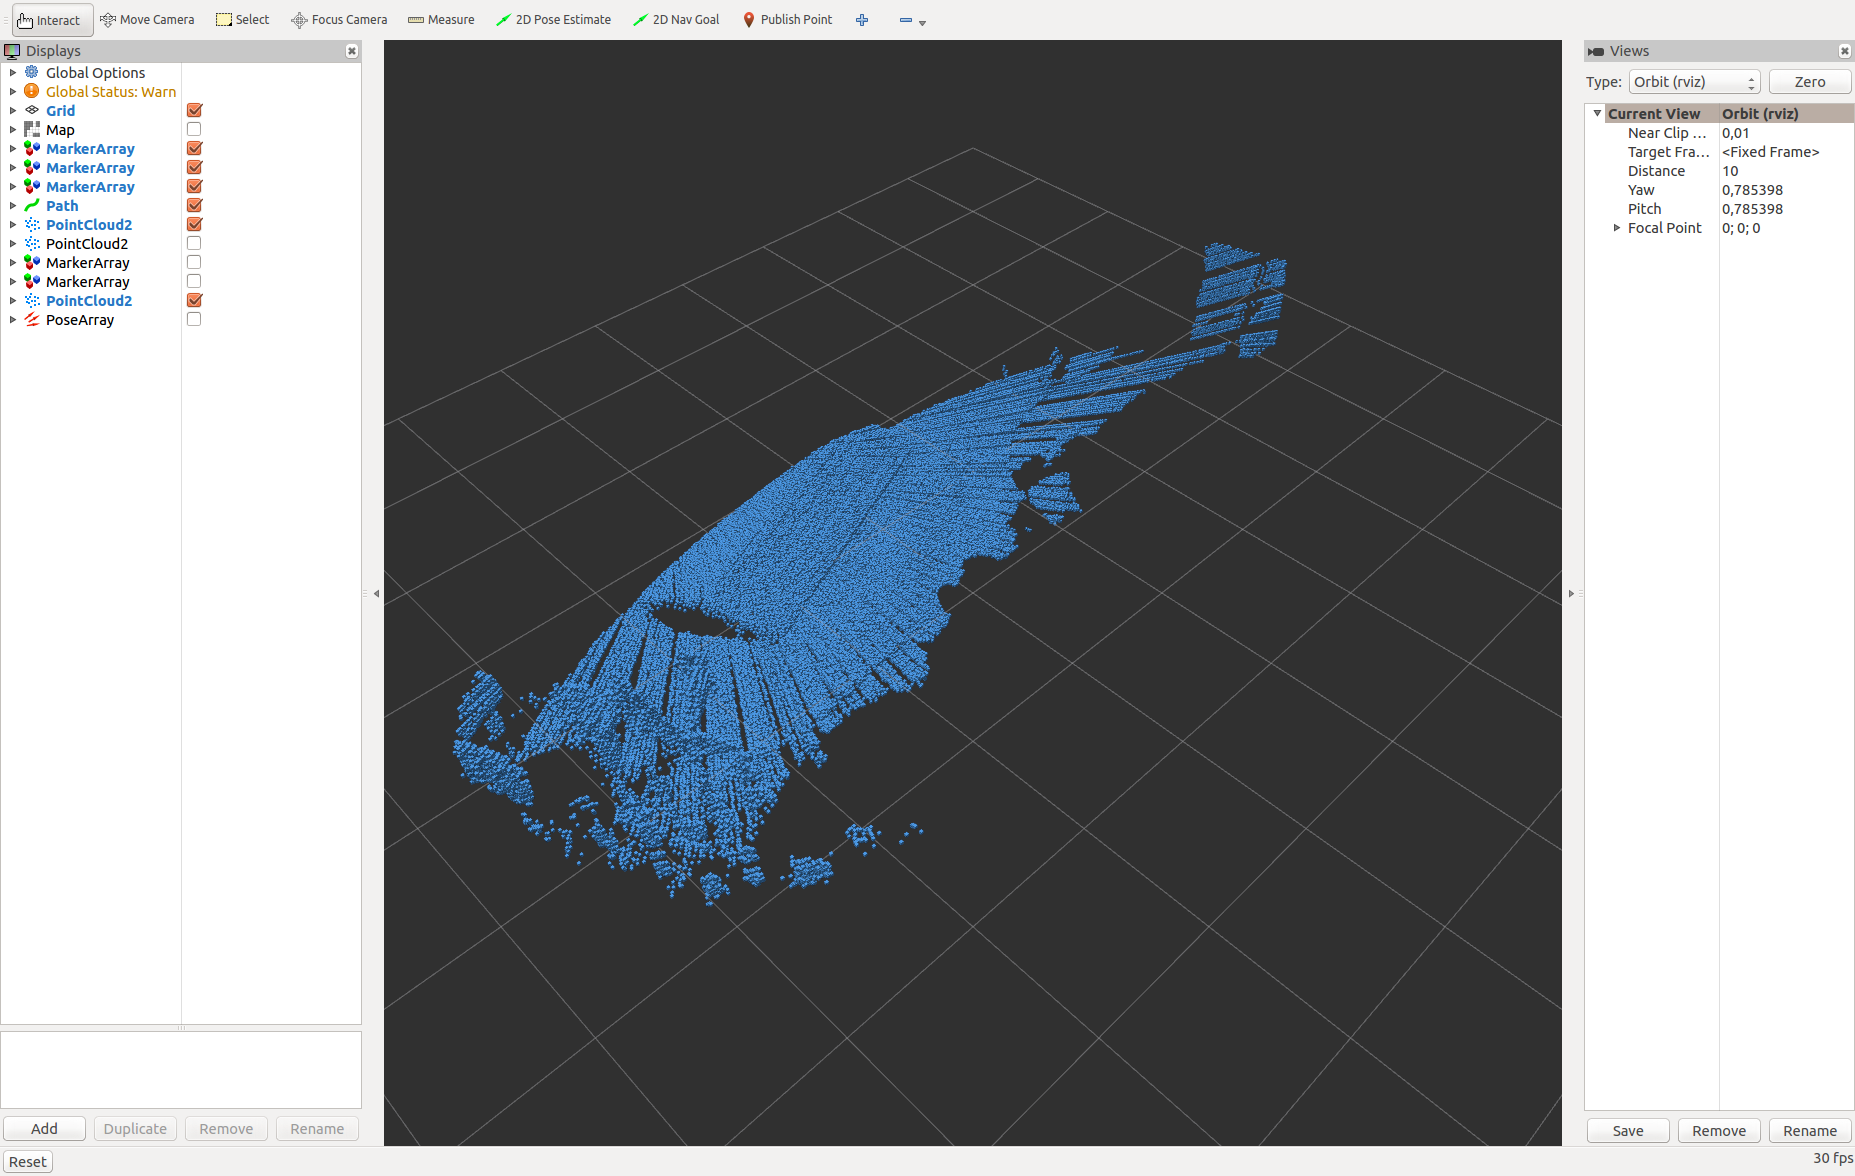
As already mentioned above, you need to set the fake robot pose by placing a 2D Pose Estimate (hotkey "p"). If you place it like illustrated in the image below, then you should get a nice world model of the pitch ramp scenario. 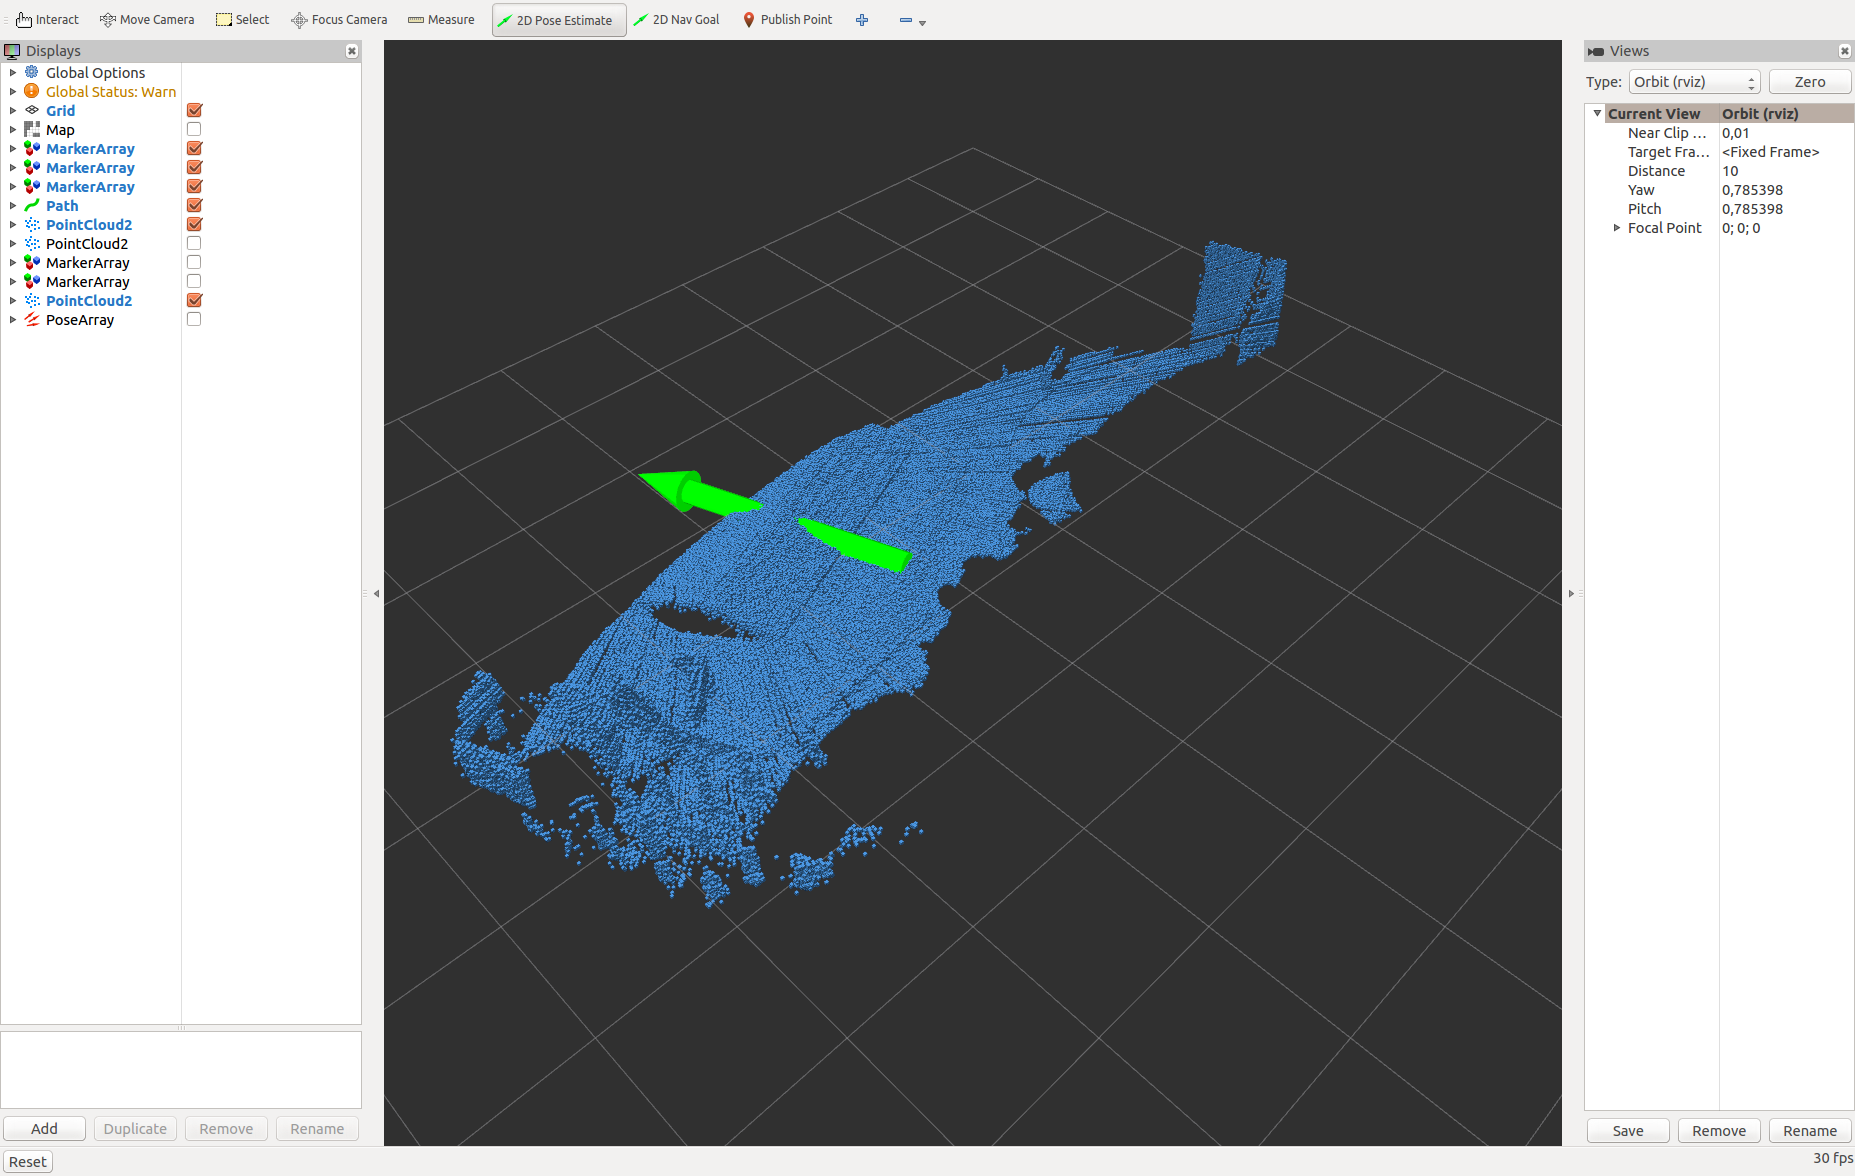
Please wait a few seconds until the world model is reasonable dense. Now you can request footstep plans over the pitch ramp by placing a 2D Nav Goal (hotkey "g"). After a few seconds you should see results similar to that demonstrated on the picture below: 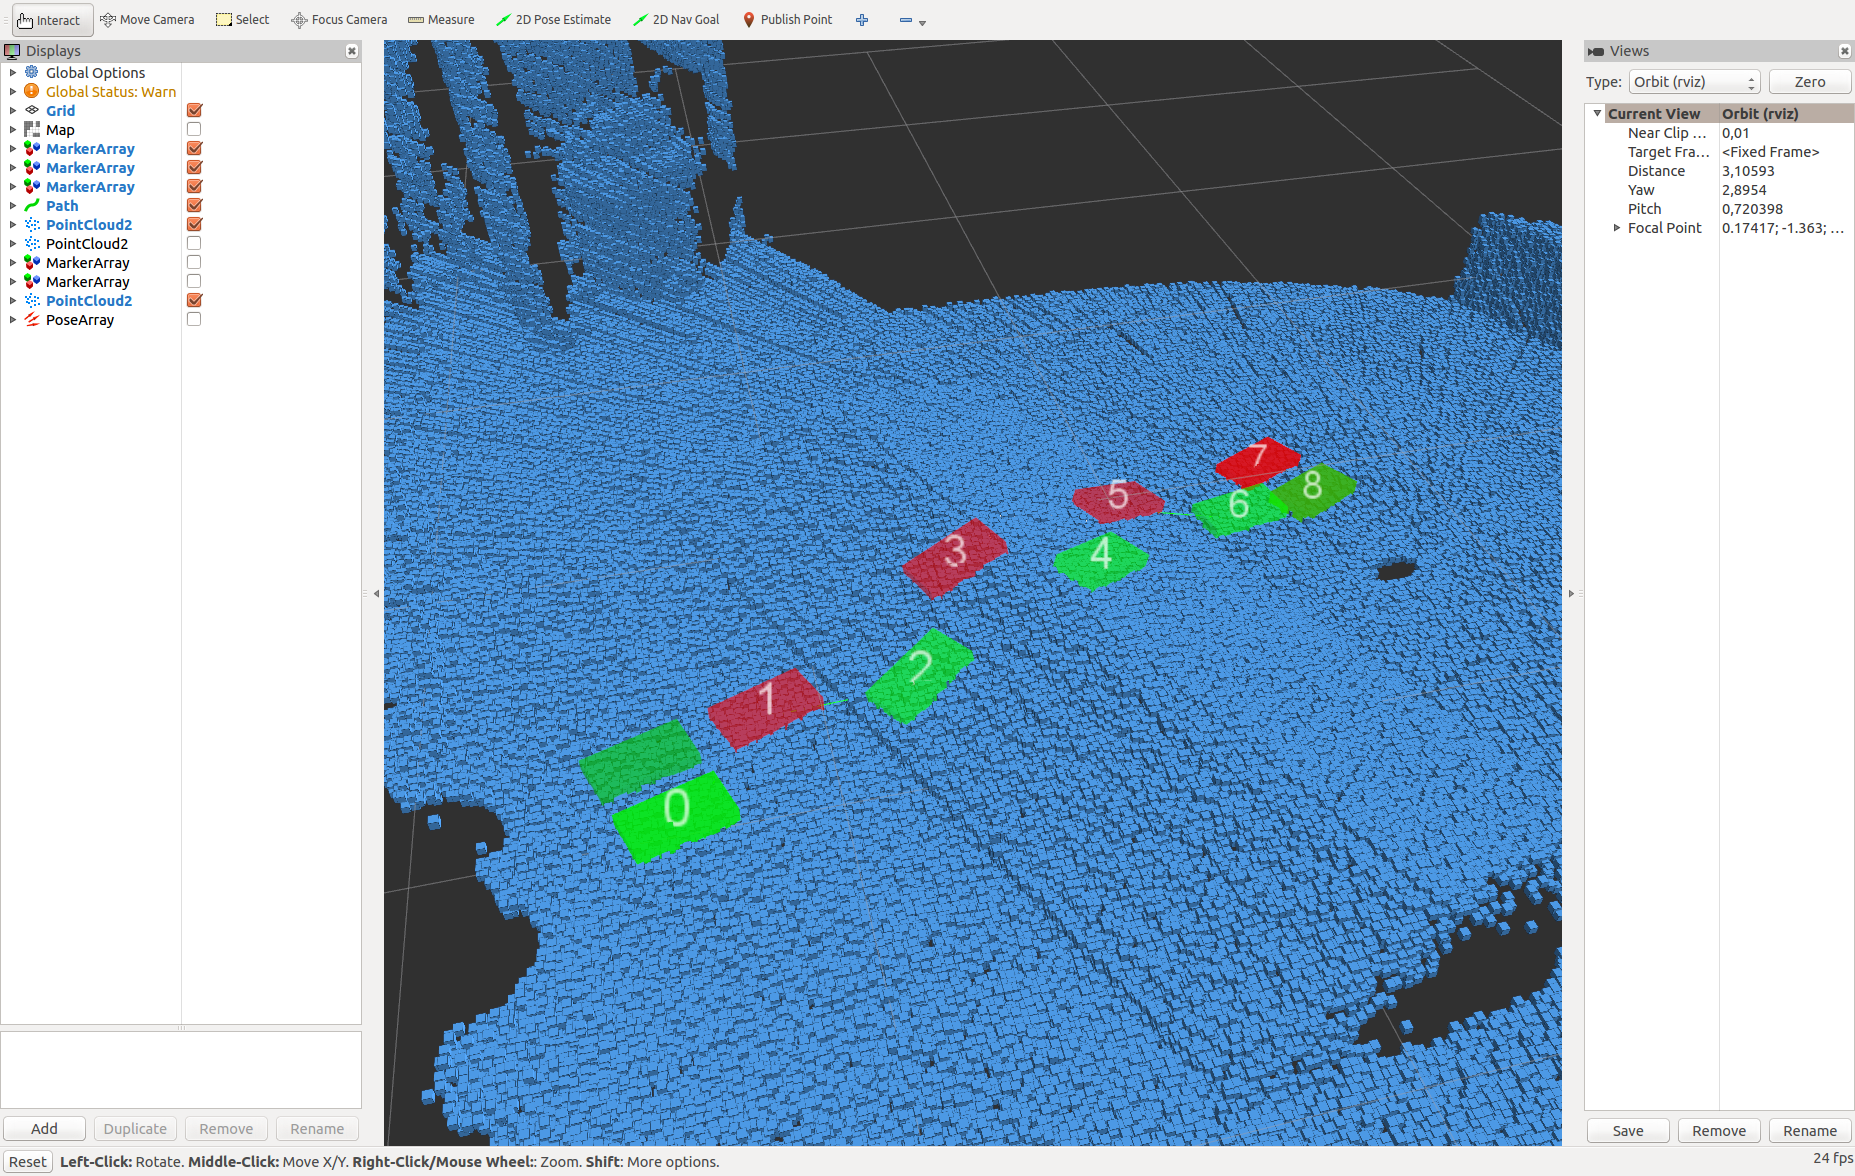
Using Own PointCloud
You can also use your own pointcloud data as the terrain_classifier can accumulate data from any arbitrary source. Just launch the standalone terrain_classifier:
roslaunch vigir_terrain_classifier terrain_classifier.launch
Now you can just publish your pointcloud data as incremental updates at /vigir/terrain_classifier/point_cloud_update in a common frame (e.g. /world).
If you wish to just generate the terrain model from a single pointcloud, the data must be published on /vigir/terrain_classifier/set_point_cloud.
Step Controller/Execution
The vigir_footstep_planning stack is accompanied by the vigir_step_control package which enables seamless integration to the low-level motion layer. In particular, this includes step queue management and step queue spooling. Using this package should simplify integration to other robot platforms while providing high-level functionality such as continuous walking (by continuous updating the step queue).
Tutorial
The vigir_footstep_planning stack takes heavy use of the vigir_pluginlib package due to heavy use of plugins (see here). In this step-by-step tutorial we do not discuss details about the vigir_pluginlib as we refer to the vigir_pluginlib documentation for details. We recommend to read through the basics of the vigir_pluginlib to understand how the footstep planning system can be customized easily.
In general, you have only to change or provide new plugins in order to modify the planning policies to your wishes.
Please take note of the vigir_step_control which provides seamless low-level hardware integration and step queue management in order to simplify even more the migration process while providing a capable step queue management system that allows even for continuous walking.
A Tutorial will be added step by step here. In the meantime don't hesitate to contact us, if you have further questions!
Sample Applications
The presented footstep planner has been applied to different robots in past.
Atlas (Darpa Robotics Challenge)
During the Darpa Robotics Challenge Trials it enabled us to perform the obstacle course:
We have continuously improved our system. At the current state, it can solve complex scenarios very quickly as demonstrated in the video below.
THORMANG3
The THORMANG3 provides a nice real world example how to migrate the software into an existing setup:
During the Humanoids@RoboCup Demo 2016 at Leipzig, the footstep planner was used as well.
THORMANG3 Demo
If you would like to try it out in simulation by yourself, then just follow the install instruction of the basic THORMANG software here which provides a fully working robot using Gazebo simulation.
Additionally, you need to install the thormang_footstep_planner and user interfaces by:
thor install footstep_planning ui
After a recompile by using
thor make
you can startup the entire system (each line should run in a seperate terminal):
roscore
thor sim
roslaunch thor_mang_footstep_planner thor_mang_footstep_planner.launch
thor ui supervisor
thor ui step_interface_rqt
When Gazebo has started up, first unpause the simulator. Afterwards, you can bring the robot in walk mode by using the supervisor_widget. You have to proceed following states with the robot:
stand_prep
stand
walk
Please wait between the states to ensure that the transition has been completed successfully.
From this point, you can work with the step_interface_widget. After selecting a parameter set you can command simple step patterns and directly execute them afterwards. As long you do not push the limits too hard, the robot will execute the steps safely in simulation.
You can also use the RViz environment to use the footstep planner by:
thor ui rviz_thor_mang_default.launch
As explained above you can use RViz to generate step plans. After a step plan has been generated you can hit the Execute button in the step_interface_widget which will then execute the recently generated plan.
Report a Bug
Use GitHub to report bugs or submit feature requests. [View active issues]
